Fisher Family Art Lab

Photo: Marisa Darabi
Drop in and draw! Visit the Art Lab to participate in an evolving series of hands-on projects with a focus on drawing, collage, prints, and books. This season the Art Lab is focusing on mail art: use rubber stamps (many artist-made), collage, and drawing materials to send out creative transmissions from our new address. For all ages.
Hours
Fridays, 2–7 PM
Saturdays, 11–7 PM
Sundays, 11–7 PM
Second Saturdays, 1-7 PM
Free First Thursdays, 11-7PM
Included with admission
Art Lab at Home
Look for us on Instagram!
BAMPFA Art Lab will offer new art projects each week to try at home. Share your work using the hashtag #bampfaartlab or email us at bampfaartlab@berkeley.edu to share your projects and ideas, and get updates about new Art Lab offerings.
Project #1
Stamp and Postcard Making
By Alayna Tinney

Though Art Lab is closed as we all shelter in place, we invite you to connect through mail art exchange. Send something to a friend whose presence you miss, or a relative who lives alone. Create a letter or piece of art to keep–a secret between you and yourself/ Take a picture of your art and share it with us at #BAMPFAArtlab.
This Wellness postcard was made by hand with care. Stay safe and in good health.
Project #2
Printing with Leaves
By Alix Blevins

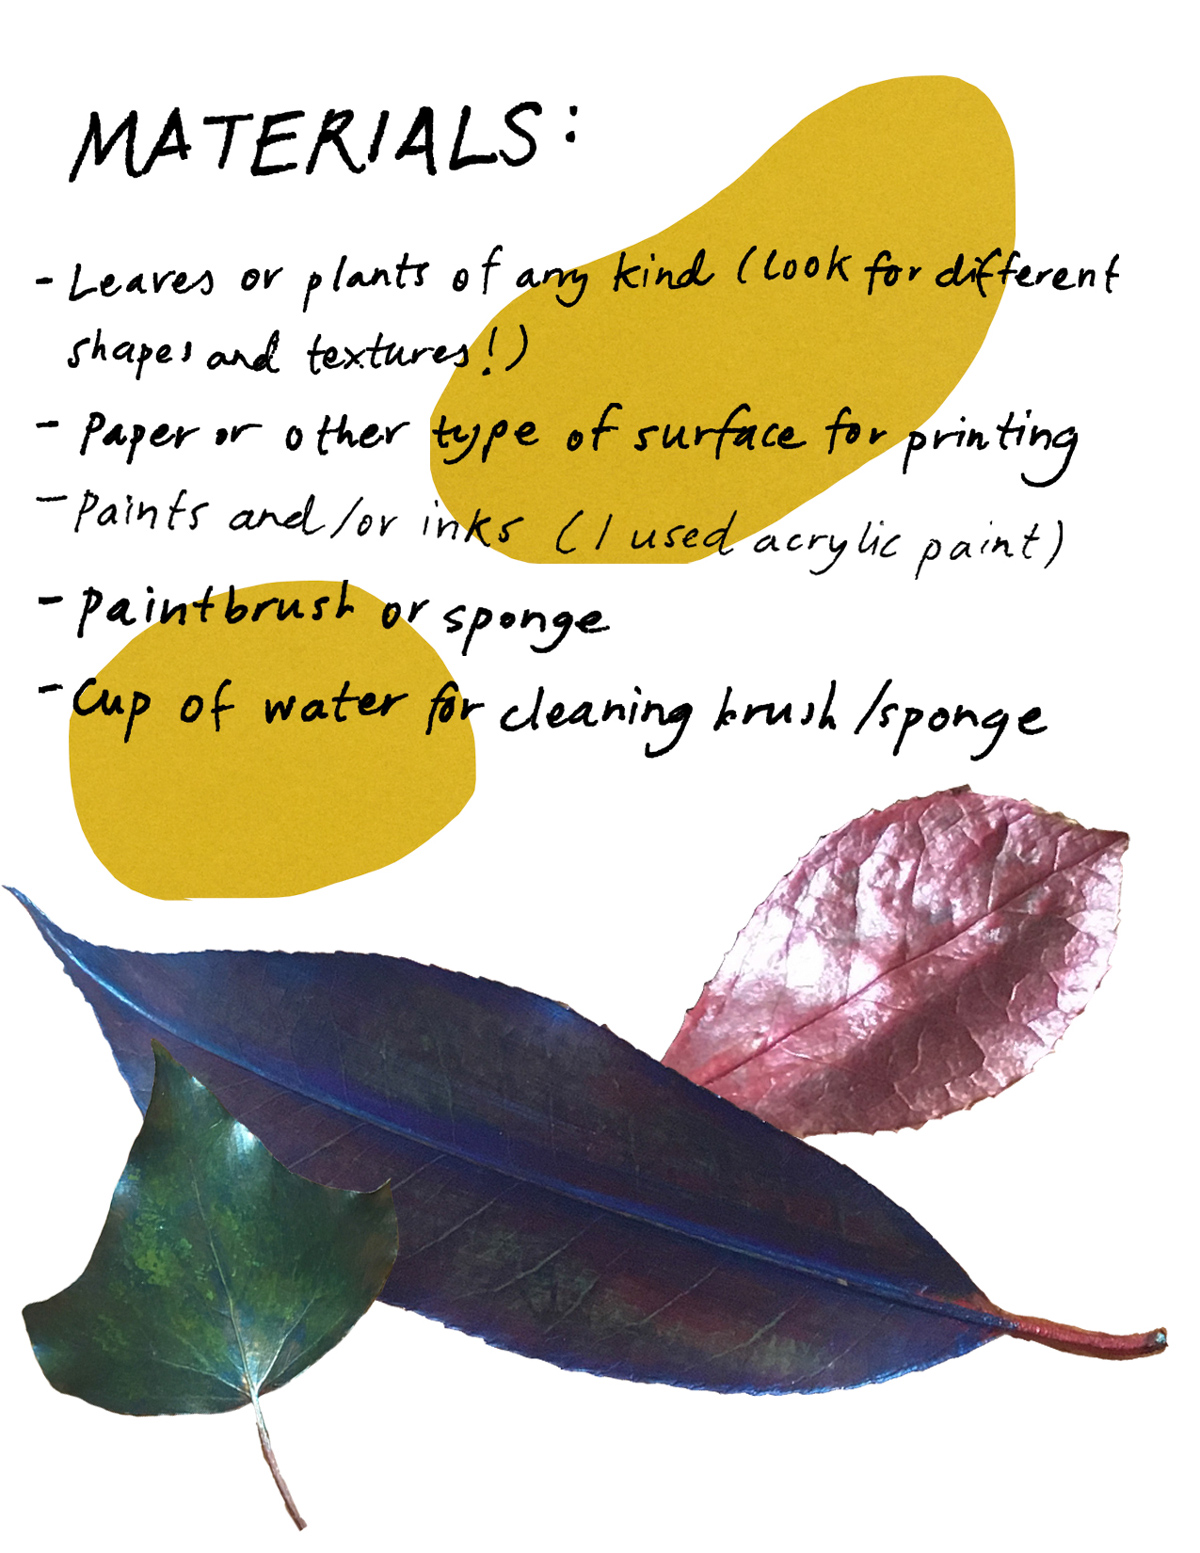
Materials:
Leaves or plants of any kind (look for different shapes and textures!)
Paper or other type of surface for printing
Paints and/or inks (I used acrylic paint)
Paintbrush or sponge
Cup of water for cleaning brush/sponge

How To:
Collect leaves and other plants from you yard or around your neighborhood.
Use a paint brush or sponge to apply paint or ink to the leaf.
Press the leaf down flat onto your paper or other printing surface. Try not to move it as you lay it down flat!
Lift the leaf carefully to reveal your print!
Tips:
Try applying the paint or ink to both sides of the leaf. Observe what the different textures look like when printed.
Try using a variety of leaves. Dead leaves, alive leaves. Big leave. Tiny leaves…

Leaf prints make great postcards to send to friends and family. Mail art is fun and healing.
Share your art with us at #bampfaartlab. Reach out with your own ideas, work, and suggestions at bampfaartlab@berkeley.edu
Project #3
Paper Plant Making
By Alayna Tinney

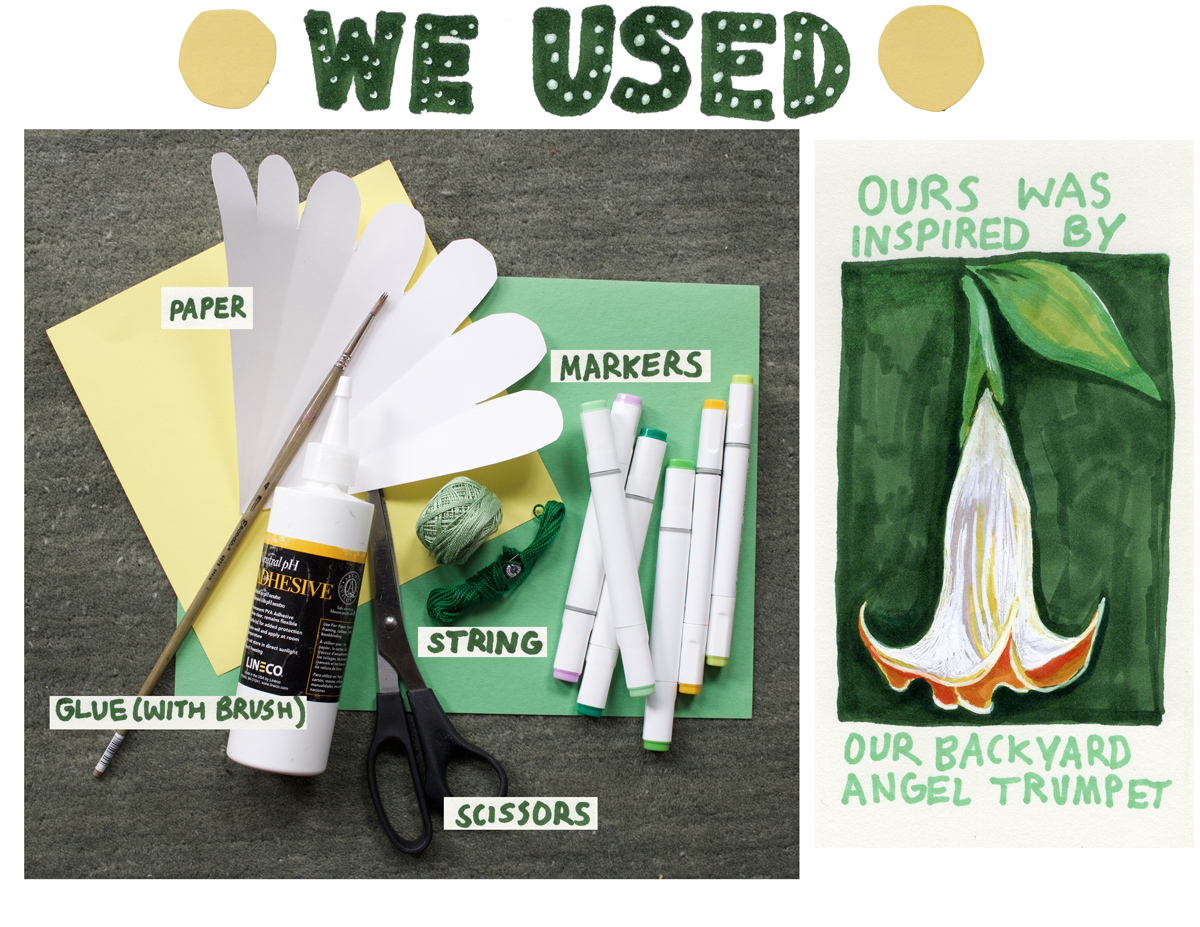
We used:
Paper
Markers
String
Scissors
Glue with brush
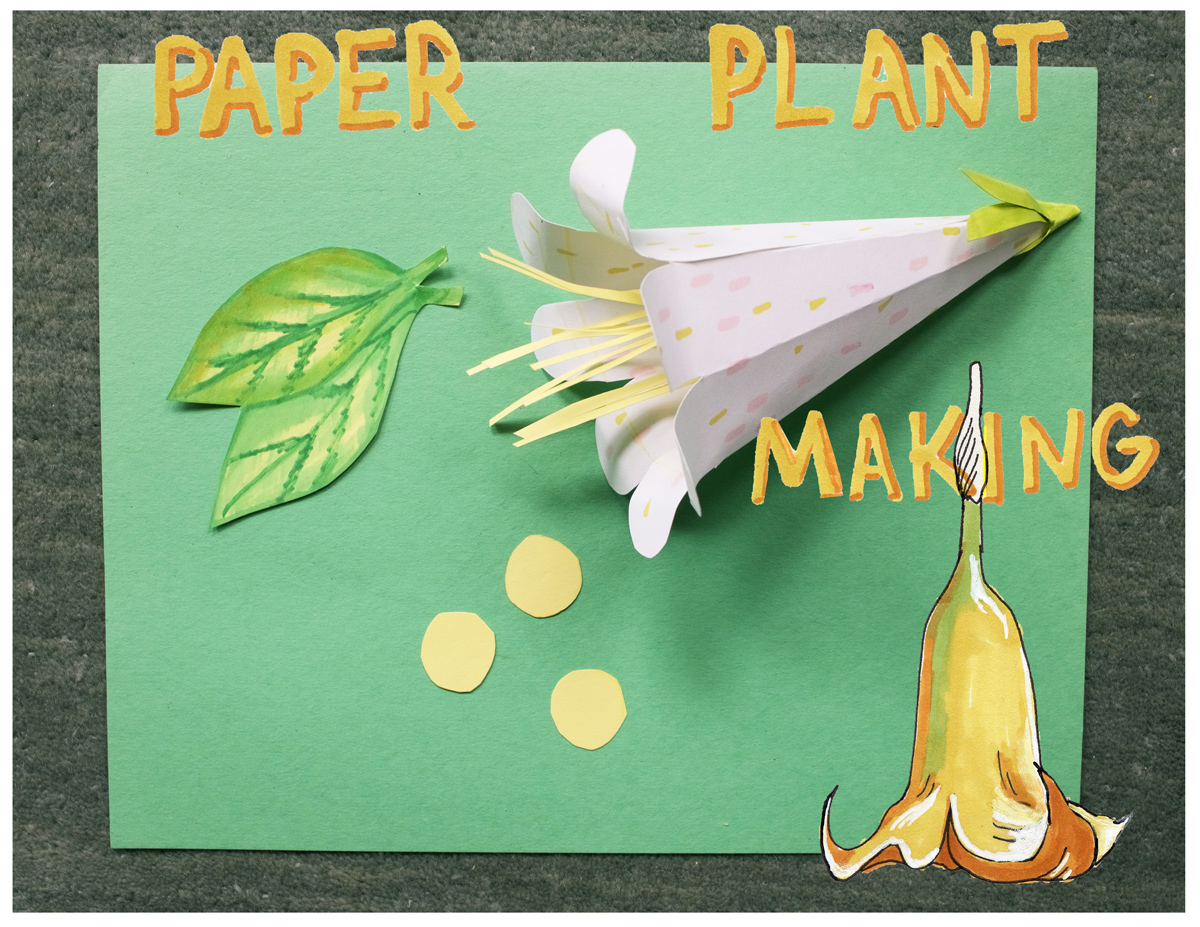
Our paper plant was inspired by a backyard Angel Trumpet

To make:
- cut out and fold this shape (a scalloped fan)
- put glue on the far left front side and on the far right back side
- color or decolorate paper
- Pressed glued edges together
*snip the pointy end with scissors just a little to make a hole
- Make a knot at the end of a string and thread the string through the flower and so that a knot catches on the inside of the flower
- Hang your flower(s) to liven up your home as you shelter in place. Or consider hanging some paper flowers on your mailbox with a thank you note to your USPS letter carrier. To support Hazard Pay for all USPS workers go to www.change.org/hazard-pay-for-all-usps-employees to sign a petition.

Now, study your own house, backyard, or neighborhood plants. What shapes, colors, and feelings do they evoke? Make your own and share with us at #bampfaartlab
Project #4
Camera Obscura
By Alix Blevins

A camera obscura is a natural phenomenon that predates the invention of film technology. It is a tool for looking and reproduction that has been used by artists for centuries.
Materials:
A room with (ideally) only one window)
Large piece(s) of cardboard, or other sturdy opaque material
Utility knife or other cutting tool
Duct tape
Aluminum foil
X-Acto knife

How To:
Cut out a piece of cardboard (or several pieces of cardboard) to fit your window(s) dimensions.
Cut out a square area (around 5”x5”) from the center of your cut cardboard.
Place the cardboard in the window(s) and duct tape in place, covering any light leaks.
Cut out a piece of aluminun foil, roughly 6”x6” (just larger than the hole in the cardboard). In the center of the foil, cut out a small circular hole. The diameter should be 0.5 inches or smaller.
Tape the foil over the hole in the cardboard. Make sure the circular hole “lens” has a clear view outside.
Cover any remaining light leaks, such as around the door.

Close the door and turn off the lights. Let your eyes adjust and view the projected image!
Project #5
Natural Dyeing
By Alayna Tinney

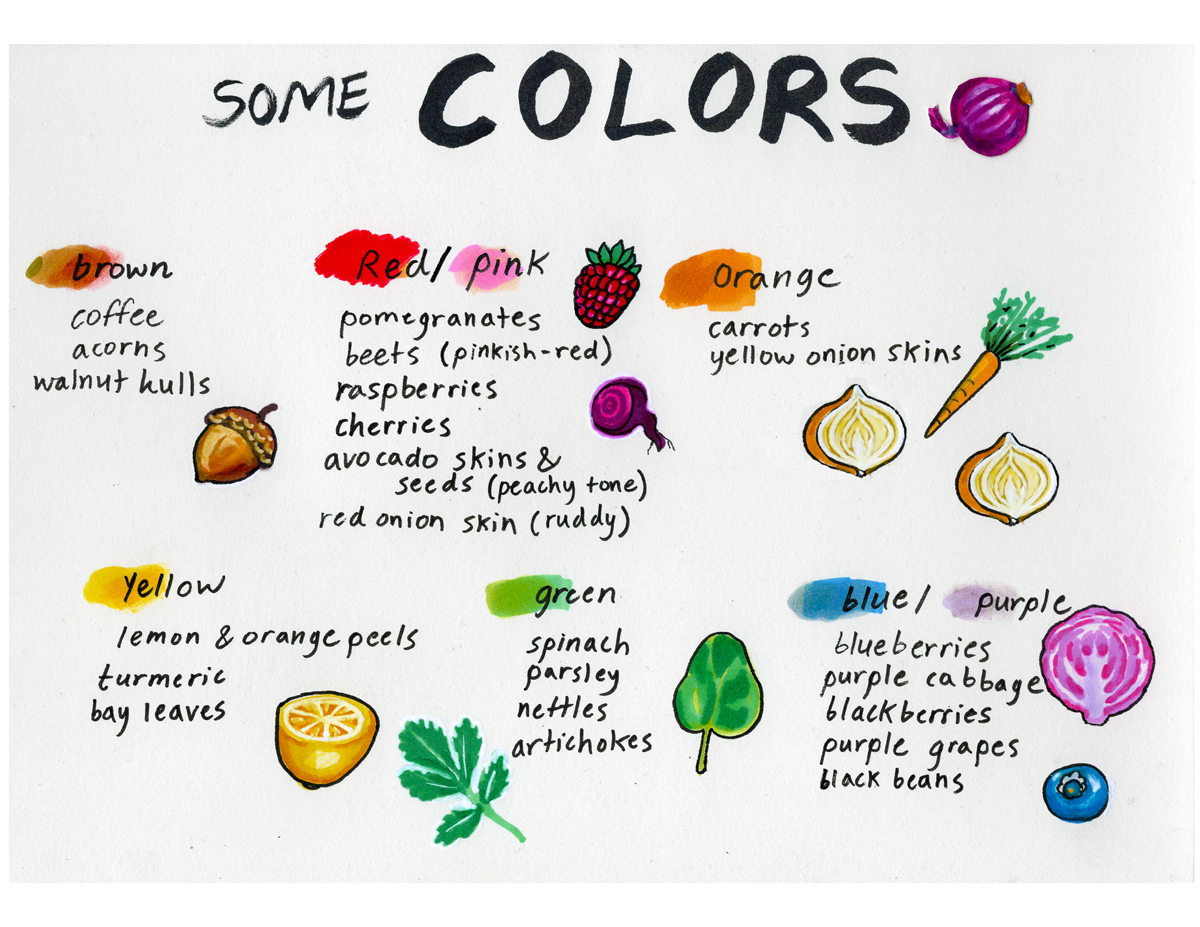
Colors:
Brown
- coffee
- acorns
- walnut hulls
Red/Pink - pomegranates
- beets (pinkish-red)
- rasberries
- cherries
- avocado skins and seeds (peachy tone)
- red onion skin (ruddy)
Orange
- carrots
- yellow onion skins
Yellow
- lemon and orange peels
- turmeric
- bay leaves
Green
- spinach
- parsley
- nettles
- artichokes
Blue / Purple
- blueberries
- purple cabbage
- blackberries
- purple grapes
- black beans

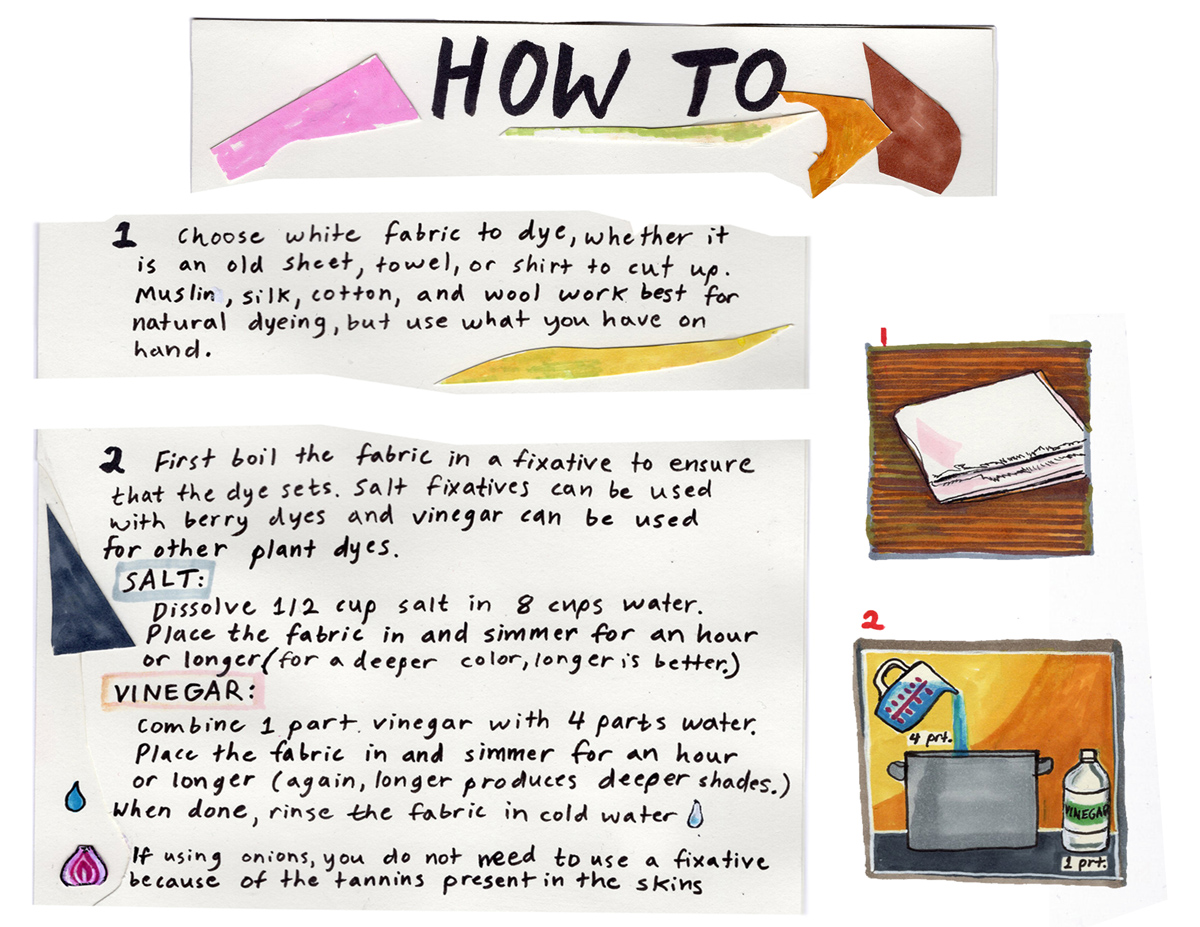
How To:
Choose white fabric to dye, whether it is an old sheet, towel, or shirt to cut up. Muslin, silk, cotton, and wool work best for natural dyeing, but use what you have on hand.
First boil the fabric in a fixative to ensure that the dye sets. Salt fixatives can be used with berry dyes and vinegar can be used for other plant dyes.
SALT: Dissolve ½ cup salt in 8 cups water. Place the fabric in and simmer for an hour or longer (for a deeper color, longer is better).
VINEGAR: Combine 1 part vinegar with 4 parts water. Place the fabric in and simmer for an hour or longer (again, longer produces deeper shades).
When done, rinse the fabric in cold water.
If using onions, you do not need to use a fixative because of the tannins present in the skins.

Chop up your veggies, fruit, or plants and put them in a pot with 2:1 ratio, plants to water. Bring the water to a boil, reduce heat, and let steep for an hour. If you want a deeper color, leave it to soak overnight with the heat off.
Strain the plant matter and put the liquid back in the pot. Place your fabric into the dye pot and let it simmer until you are happy with the shade. Rinse the fabric well when done.
Sharing:
Stay tuned for Part 2, hand-sewing the fabric into a flag, banner, or other shape to put up on display in your window.